Preliminary information

Before getting to the heart of this tutorial and explain yourself in detail how to activate subs on Twitch, it may be useful to know which type of user can activate the subscriptions for their Twitch channel and what are the minimum requirements to do so.
First of all, you need to know that to activate the subs on Twitch you need to be part of the affiliate program of the famous video streaming platform. In fact, Twitch affiliates can start earning by accepting subscriptions from their viewers and activating other options, such as donating bits and broadcasting advertisements during live broadcasts.
If you are wondering what the minimum requirements to apply for Twitch affiliation, know that it is enough to have a channel with at least 50 follower and have totaled in the last 30 days at least 8 hours of broadcast to 7 or more different days keeping a average of 3 or more simultaneous viewers, including any hosts and raids.
So if you've just signed up on Twitch and can't wait to build your community and start earning with subs, all you have to do is start streaming on Twitch and try to meet the requirements I just set you up. indicated, in order to become an affiliate of the famous video streaming platform. Speaking of which, my guide on how to grow on Twitch might help.
How to activate subs on Twitch
As mentioned in the opening lines of this guide, for activate subs on Twitch you must have met the minimum requirements to participate in the affiliate program of the famous platform owned by Amazon.
To check it, connect to the Twitch main page and, if you have not already done so, log in to your account: then click on the button Log in located at the top right, enter your data in the fields Username e Password and firstly your pulse Log in.
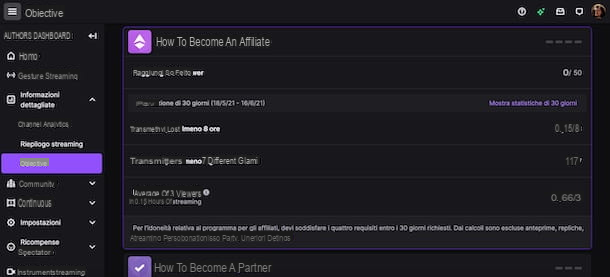
Now, click on yours photo located at the top right, choose the option Channel from the menu that opens and, in the new screen displayed, select the item Author dashboard. Then press on the item Detailed information and click on the options Aims e How to become an affiliate, to view your channel stats and find out what goals you still need to achieve to become a Twitch Affiliate.
After you have achieved all the objectives indicated in the section How to become an affiliate of your Twitch channel, you will receive an invitation from the platform staff and can then fill out the registration form to participate in the Twitch Affiliate Program.
To do this, access the section again Author dashboard of your channel, select the options Detailed information, Aims e How to become an affiliate and click on your voice Completed.
On the screen Payment registration, insertion and date richiesti nei campi Channel name, Your name, Last name, Birthday, Email e Confirm email, while in the section Permanent address specify your residence details in the fields Country, Street Address, City, POSTAL CODE; finally, click on the button Continue.
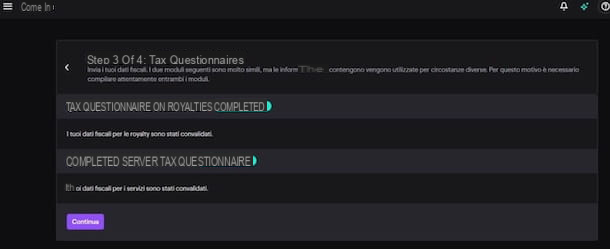
Now, tap on the item Accept to accept the Twitch Affiliate Agreement and, on the new page that opens, select the option Start the royalty tax interview, to fill in the form relating to your tax information. Then enter the required data in the section Data reference (these are the same data previously requested in the screen Payment registration) and the first button Open the Royalty Tax Questionnaire form.
At this point, fill out the form in question by entering your tax information in the sections User information e Tax identity information, making sure to put the check mark next to the option I don't have a US TIN (if that's true, of course) and to enter yours fiscal Code in the field Valore TIN.
Then click on the button Continue, select yours country of tax residence (Eg. city) via the drop-down menu, check the box for use electronic signature as validation of the information provided, enter your first and last name in the field Company and click on the button Save and preview.
On the new screen that appears, make sure next to the entry Applicable withholding tax rate option is present 0% (if not, you will have to fill in the form again, as you have probably entered some incorrect data) and press the button Exit the questionnaire, to return to the section Author dashboard di Twitch.
At this point, if you have filled in the previous forms correctly, you should see the writing Completed next to the items Royalty Tax Questionnaire e Tax questionnaire on services. Premium, quindi, sul pulsating Continue, select the option Set up payment method and click on the button Modification, to indicate the payment method on which to receive the revenues related to your earnings on Twitch (eg. PayPal, direct credit to the current account, Bank transfer etc.).
Once this is done, click on the button Following and, within a few hours, you will receive confirmation from Twitch that you have successfully registered with the affiliate program and, consequently, that you have activated subs for your channel.
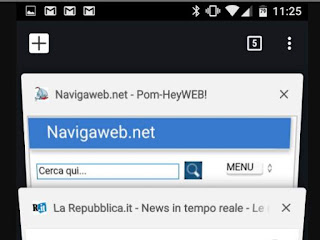
If, on the other hand, you are wondering if it is possible to do all this from smartphones and tablets using the Twitch app for Android devices (also available on alternative stores, for devices without Google services) and iPhone / iPad, I'm sorry to tell you that the answer is no. The only way to do this, at least at the time of writing this guide, is to connect to Twitch from a browser, activating the desktop view of the site.
To do this, launch the web browser installed on your device and connect to the Twitch main page. Now if you are using Chrome on Android, tap on the icon of three dots located at the top right and select the option Desktop site from the menu that opens. If, on the other hand, you have an iPhone / iPad and are using Safari, premium sull'icona AA placed in the address bar and press on the item Request desktop site.
At this point, all you have to do is log in to Twitch and follow the directions I gave you above to fill out the Twitch Affiliate Program membership form from your computer.
How to manage subs on Twitch
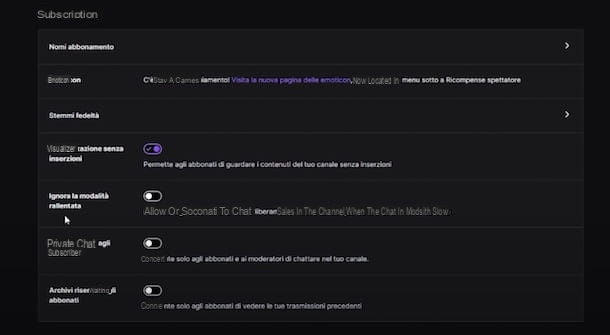
After completing the Twitch Affiliate Program registration process, subs will automatically be active on your channel and users who wish to do so can begin subscribing. Having said that, you must know that by accessing the section Affiliated of your Twitch channel you can customize the name of the subscriptions and indicate the rewards dedicated to the subscribed viewers.
To do this, connected to the Twitch main page, click on yours photoat the top right, and select the option Author dashboard from the opened menu. In the new screen that appears, tap on the options Settings e Affiliated and identify the section Subscriptions.
Then click on the item Subscription names, enter the names to be assigned to the three types of subscriptions available on Twitch in the fields Level 1 subscription name, Level 2 subscription name e Level 3 subscription name and press pulsating Save Changes, per salvare I modified it.
By accessing, instead, the section Loyalty badges, you can choose the badges that will be assigned to subscribers and that will be visible next to their name in the chat of your channel. To upload custom badges, select the option Basic in the drop-down menu Manage badges e clicca sull'opzione Upload image, to upload the images of your interest.
If you wish, you can "reward" subscribers for several months with different badges: in this case, select the option you are interested in (eg. 2 months, 3 months, 4 months etc.) in the drop-down menu Manage badges and repeat the procedure I indicated earlier. Finally, click on the buttons Upload coat of arms e Save, to upload your own custom badges.
In the Subscriptions, you can enable additional options dedicated to users who have activated a sub on your channel.
- Display without ads: allows you to disable advertising breaks during live broadcasts for subscribers;
- Ignore slow mode: allows subscribers to continue chatting normally even when the chat is set to slow mode;
- Chat reserved for subscribers: if activated, only subscribers will be able to post messages in chat. I recommend that you keep this option disabled, especially if you have a small Twitch channel and are looking to stand out. Please note that this option can still be activated temporarily while streaming on Twitch.
- Archives reserved for subscribers: by activating this option, only subscribers can see the saved live broadcasts. To learn more, you can check out my guide on how to save live on Twitch.
Among the advantages that you can dedicate to your subscribers there are also the custom emoticons to use in chat, which you can set from the Author dashboard of your Twitch channel by clicking on the options Spectator rewards ed Emoticon located in the sidebar on the left.
In the new screen that appears, in the section Subscriber emoticon, click here + relative to the level of subscription you are interested in, press the icon of freccia rivolta verse l'alto and select the image to upload. Then click on the button Charge And that's it.
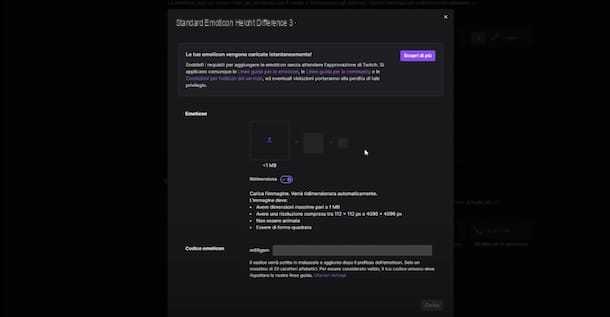
If you've just signed up for Twitch Affiliate Program, you can only upload one custom emoticon. As the number of subscribers to your channel increases, the slots dedicated to custom emoticons will also increase (2 emoticons after 15 subs, 3 emoticons after 25 subs, 4 emoticons after 35 subs e 5 emoticons after 50 subs). Added to these are two additional emoticons, one for subscription level 2 and one for level 3. Twitch partners can have more emoticons.
Another benefit that you can only offer to your subscribers is to create clips during your streams. If you want to activate this option, select the items Settings e Stream in the left sidebar, locate the section Clip settings and, after making sure you have activated the clips on your channel by moving the toggle next to the item Enable clips da OFF a ON, move the lever for the option For subscribers only da OFF a ON.
Finally, I point out that by pressing on the option Detailed information located in the sidebar on the left in the Author dashboard of your channel and accessing the section Channel analytics, you can view the statistics of your channel, including those relating to the number of subscriptions received (Subscriptions) and total revenue (revenue).
Again, if your intention is to manage your Twitch channel subscriptions from smartphones and tablets, you need to connect to the official Twitch site and activate the desktop view of the site. Once this is done, to manage the options related to subscribers to your channel and monitor earnings, all you have to do is follow the instructions I have just given you to do it from your computer.
How to activate subs on Twitch