Customize system properties on Windows 10 / 8.x / 7
Be vuoi scoprire how to customize system properties and use a PC equipped with Windows 10, Windows 8.x o Windows 7, you must first prepare the image to be displayed in the "System" field of the panel with the details on your PC.
The image you need to prepare must be in formato BMP a 32 bit (so 24-bit BMP images that save Paint and other commonly used programs are not good) and must be between 92 × 92 pixels e 120 × 120 pixels.
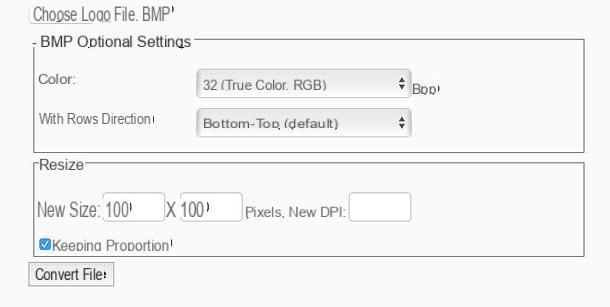
To resize an image to the format you need and export it as a 32-bit BMP file, you can use the Free Online Converter online service, which is completely free and very easy to use. Connected, therefore, to the home page of the service in question, click on the button Choose file and select the image you want to insert in your system properties.
Then select the item 32 (True color, RGB) give menu to tendin Color, set the size you want the image to assume (eg. 100 × 100 pixels) In fields New size and click on the button Convert file which is located at the bottom. Within seconds, the image will be automatically converted and downloaded to your PC. If not, click the link direct download link.
When the download is complete, rename the image downloaded from Free Online Converter to logo.bmp and copy it to the folder C: WindowsSystem32 of your computer. You will be asked for confirmation to complete the operation. If any error messages appear, make sure you are using a user account with administrator privileges.
Once you have renamed the image to be displayed in the system properties, you can proceed to enter the information to be displayed in the "Support" area. Then call up the panel Esegui ... Windows by pressing the key combination Win + R on your PC keyboard and give the command regedit to open Registry Editor.
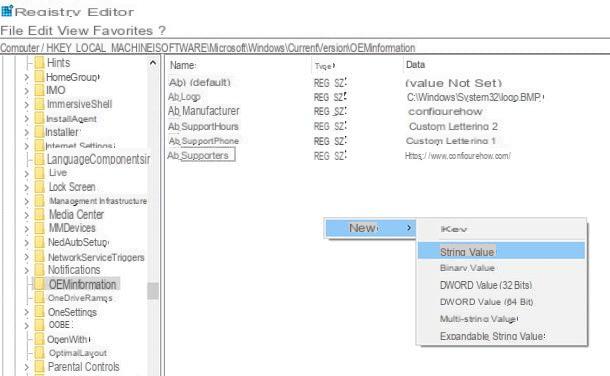
In the window that opens, use the navigation menu located on the left to reach the route HKEY_LOCAL_MACHlNESOFTWAREMicrosoftWindowsCurrentVersionOEMInformation. If the folder OEMInformation is not there, right click on the folder CurrentVersion, select the items New> Key from the menu that opens and rename the newly created folder to OEMInformation.
At this point, select the folder OEMInformation, right click in the right side of the Registry Editor, select the entries New> String Value from the menu that opens and create the following strings.
- Manufacturer - is the string in which the name of the computer manufacturer must be entered (here you can enter, for example, your name).
- Support hours - it is the string in which the times in which the manufacturer of the PC provides assistance must be entered (you can enter any custom written).
- Support Phone - it is the string in which the telephone number of the PC manufacturer must be entered (you can enter any customized text).
- SupportURL - is the string in which the address of the site you want to access must be entered by clicking on the link that refers to the site of the PC manufacturer in the menu with the system properties.
- Logo - is the string in which the path of the image to be used as a logo to be displayed in the system properties must be indicated. In your case you have to enter C:WindowsSystem32logo.bmp.
To change the value of a string, all you have to do is double click on its name, type the value you want to assign it in the text field that appears on the screen and save the changes by pressing the button OK.
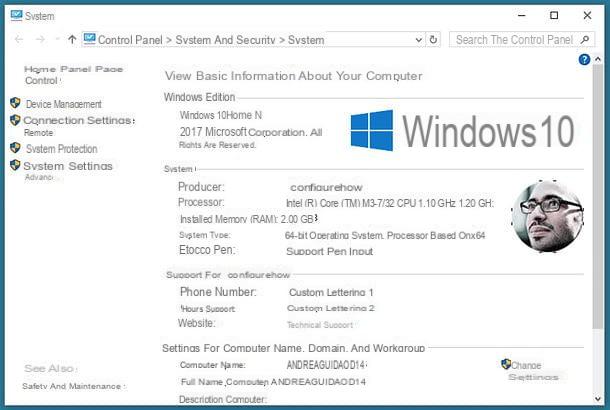
Mission accomplished! Now open theFile Explorer Windows (the yellow folder icon located on the taskbar), right click on the icon PC / Computer question located in the left sidebar and select the item Property give the menu answer.
If everything went well, in the window that you will see on the screen (the window with the system properties) you will also find your logo (on the right side of the field System), your name (in the field Producer), the address of your site (via the link Technical support) and the custom text strings you entered as Phone Number e Support hours.
If the above procedure seems a little too long and complicated to complete, you can also create one registry script and add all the information to the latter with a simple double click.
To create the script, open the Block notes and paste the following block of text into it.
Windows Registry Editor Version 5.00
[HKEY_LOCAL_MACHINESOFTWAREMicrosoftWindowsCurrentVersionOEMInformation]
"Manufacturer"=" configurehow"
"Logo"="C:WindowsSystem32logo.bmp"
"SupportPhone" = "Custom lettering 1"
"SupportHours" = "Custom script 2"
"SupportURL"="https://www.masterswindows.com/"
Obviously, instead of my name and the address of my site, you can enter the information you prefer.
Once you have created the file in Notepad, save it by going to the menu File> Save with nome which is located at the top left. Then, in the window that opens, type the name you want to assign to the script in the field File name adding the extension to its end .Reg (Eg. System properties.reg), select the option All files give menu to tendin Save eat and proceed with saving the document in the folder you prefer.

At this point, to apply the changes to the registry and customize the properties of the system, all you have to do is open the file .reg you have just created and confirm by answering affirmatively to all the warnings that appear on the screen.
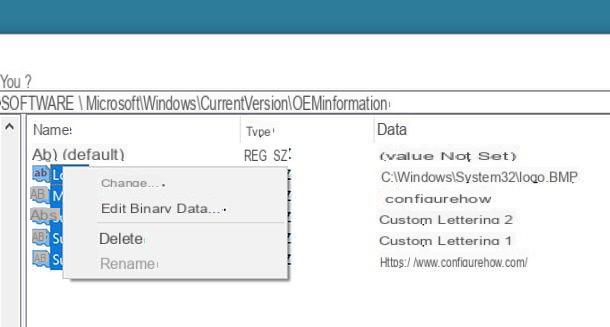
In case of second thoughts, do not panic, you can change all the information you have added to the system properties or delete it: simply change or delete the relevant keys in the system registry.
Back, therefore, in regedit, navigate to the folder HKEY_LOCAL_MACHlNESOFTWAREMicrosoftWindowsCurrentVersionOEMInformation and edit or delete the strings you created earlier. To delete strings, right click on them, select the item Delete from the menu that pops up and answer Yes notice that appears on the screen.
The changes will be immediately visible in the system properties menu, without the need to restart the PC or the Windows File Explorer.
Customize System Properties on Windows XP
If you still use Windows XP (You shouldn't, it's an outdated operating system and no longer supported by Microsoft!), you can customize the system properties by acting differently than previously seen for newer editions of Windows.
First, you need to "package" the logo to be displayed in the field Produced by of the window with the system properties (which can be called up by going to Start> Control Panel> System Properties and selecting the tab General). This is a simple image in .bmp format. This image can have the maximum size of 180 pixels in width and 114 pixels in height.
The file must be saved with the name of oemlogo.bmp in the folder System32 Windows, which is usually found in C: WindowsSystem32.
After creating the image, you need to create a text file with the information to be displayed in the system properties panel. With a text editor, such as the Block notes Windows, copy the following lines, obviously customizing them freely according to your imagination.
[General]
These are the lines that will be displayed
above the PC processor name
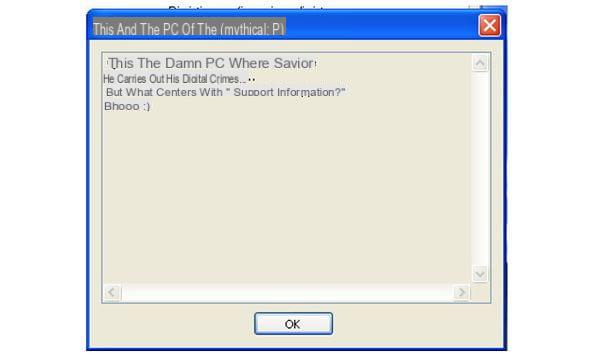
Manufacturer = "This is the PC of the (mythical: P)"
Model=""
[Support Information]
These are the lines that appear
by clicking on the "Support Information" button
Line1 = "This is the goddamn PC where"
Line2 = "commits his digital crimes…."
Line3 = "But what does it have to do with" Support Information? "
Line4 = "Bhooo :)"
Once created, the file must be renamed to oeminfo.ini and must be placed inside the folder System32 Windows. The first two lines allow you to indicate the name of the manufacturer and the model, the following lines are the information that appears by clicking on the button Support information.
Opening the System PropertiesIn section General the text inserted in the first two lines of the file will be visible oeminfo.ini, then clicking on the button Support information the rows inserted in the section will be visible [Support Information]. Put these tricks into practice and show your friends who's dominating your computer! ;)
How to customize system properties