Index:
How to synchronize folders with Homegroup
The first method that I recommend you to use if you have two computers with Windows operating system is the one related to the native functionality of Windows, called Home Group. You will then be able to make sure that the two computers can share and synchronize folders on the network, so that you can easily share multimedia files and documents with each other.
Unlike the methods of sharing and synchronizing files and folders online, this feature does not require an active Internet connection, but only that the two computers are within the same network, like the home one. You will then have to connect your computers to the network via LAN network cable or Wi-Fi, perhaps using a router.
Furthermore, the files will be accessible only and only if the computer from which to read the files is logged on; otherwise, the folder and files will not be reachable. In any case, I advise you to read my guide on how to connect two PCs, so as to realize if the connection procedure has been carried out correctly. If not, stick to the guide I gave you, so as not to make any mistakes.
After connecting the PCs in the same network, you can then start configuring the Home Group. You will first have to reach the Windows Control Panel, by clicking on the button Home and selecting the voice Control Panel. In Windows 10, you'll need to click the button instead Search (icon with symbol of a magnifying glass) which located in the Application Bar. You will then have to type in the term control panel and click on the corresponding search result.
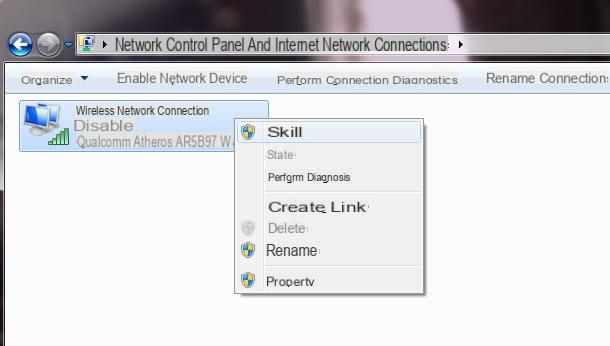
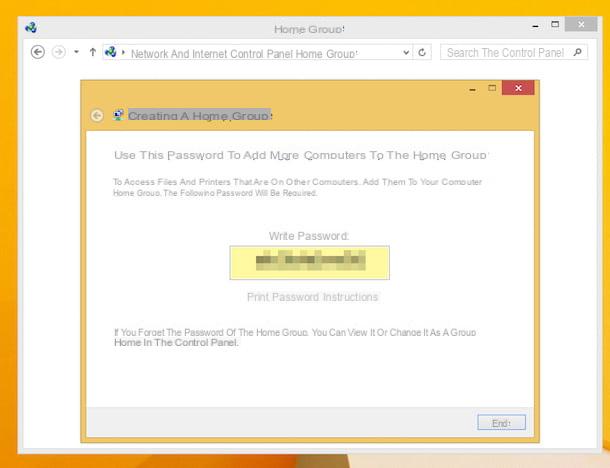
After opening the Control Panel, click on the item Rete and Internet and then select the one showing the wording Home Group. In the new window that opens, click the button Create a Home Group e follow the procedure that will be shown to you. Then select all the items on your computer that you want to share, placing the check mark on each of them, and confirm everything by clicking on the button Forward.
Copy the Password that you will see, without which you will not be able to allow other PCs to access Home Group just created. Then complete the procedure by clicking on the button end.
On any other Windows computer connected to the same network as the previous computer, perform the same procedure described above. But inside the panel Home Group, you will find a different button, named Participate now. By clicking on it, you will have to follow the on-screen procedure that will ask you to enter the password you wrote down before.
This will allow Windows computers to access the same sharing group, thus allowing the synchronization of folders and files between the PCs. To view the content to be synchronized, you will need to transfer files and folders within the shared ones, which you will find by opening Explore Resources and clicking on the item Home Group, which you find in the left bar.
You can also share individual files and folders by right-clicking on them and selecting the entry Share with. Then select the item Homegroup (view) or Homegroup (view and edit).
Software to synchronize folders
Dropbox (Windows / macOS)
Dropbox is a service free cloud storage that allows you to keep a copy of your files and folders in a virtual space. These files will be accessible directly from the Web interface or via application.
In the latter case, you can download the dedicated tool to allow you to synchronize files and folders between the Dropbox cloud service and your PC. You can download the installation tool via the official website, both for computers with Windows operating system and for those with macOS operating system. In this guide, I will cover installation on Windows devices.
After pre-washing the installation file, double-click with the left button of your mouse on it and click the button Yes, in the Windows User Account Control window. Then wait for all the files necessary for the installation to be downloaded and for it to complete.
After Dropbox has been installed, a window will open in which you will need to enter your login details. If you haven't registered a Dropbox account yet, you can do so via this link.
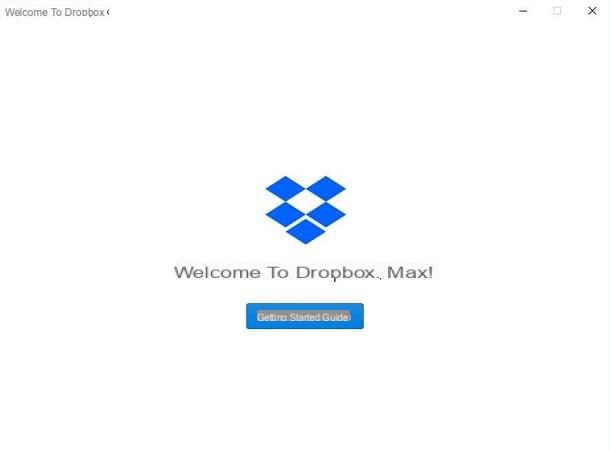
After entering them, click the button Log in. A new window will then open where you need to click on the button Open my Dropbox and then on the button Getting started guide. Then view the guide that is presented to you on the screen, continuing by clicking on the button NEXT three times, and concluding the procedure by clicking the button Ends.
A window of Explore Resources which will show you the contents of your virtual cloud, in case there are any files.
To then synchronize the folders or files on your PC to your Dropbox, you will simply have to drag them into the Dropbox folder. When the file or folder has been synced, you will notice a green check mark on it. You can also decide to right-click on the file or folder to be synchronized and select the item Move to Dropbox.
OneDrive (Windows / macOS)
Even Microsoft's cloud service, OneDrive, allows you to store and synchronize files and folders online from your PC. The service is free and a Microsoft account is required to use it. If you don't have one, you can read my guide on how to create a Microsoft account.
If you are interested, I warn you that the software (or rather the application) is already installed on your computer with Windows 10. However, if it is no longer present or you have Windows 7 or Windows 8 / 8.1, you can download the software free for synchronizing files and folders via this link. If you have a computer with a macOS operating system, you can download the app from Apple's Mac App Store.
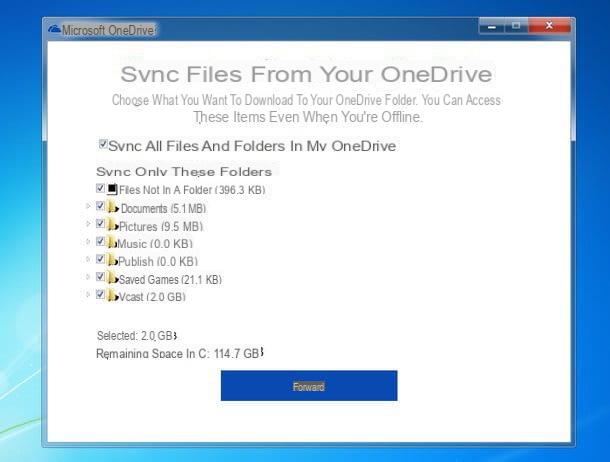
After downloading and installing the OneDrive application, if any, log in with your Microsoft account credentials. Also check that the standard path for local synchronization is adequate for your needs, otherwise you can change it, using the button Change position.
After clicking the button Forward, you will need to select the items to sync. Then make your choice and click NEXT. Then click the button Open my OneDrive folder to view the synchronized content (if present in the cloud). You will be able to open the OneDrive folder on your computer by going to Windows Explorer Windows and selecting, from the left sidebar, the item OneDrive.
All files and folders can be transferred to OneDrive by dragging them into the local OneDrive folder.
Google Drive backup and sync (Windows / macOS)
Another tool that can do for you is Backup and synchronization by Google. This tool allows you to synchronize your cloud folders of Google Drive with your PC.
In this regard, I remind you that the storage space made available for free by Google Drive is equal to 15 GB and that it is possible to expand it for a fee, by subscribing to the service Google One. The latter has prices starting from € 1,99 / month, to get a storage space of 100 GB. The maximum space that can be purchased, on the other hand, is 30 TB, at the price of € 299,99 / month.
Furthermore, as for the other services mentioned above, also in this case you will need to have an account, more precisely a Google account, without which you will not be able to use the service. You can refer to my guide on how to create a Google account, if you encounter any problems creating the mentioned account.
To download this software, you can go to this web page and click Download, in the box Backup and Synchronization. You can continue by clicking on the button Accept and download to start the download. In this guide, I will be installing this software for computers running Windows.
Double-click with the left button of your mouse on the file you downloaded and click on Yes, in the Windows User Account Control window. Then wait for all the necessary files to be downloaded and for the installation to complete. Then click on Close and then Start.
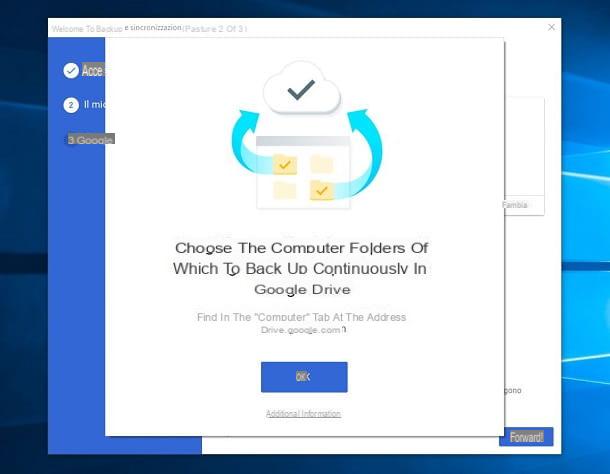
Then log in with your Google login credentials. Then click the button Ok and select the folders to sync to the Google Drive cloud. Then confirm your choice by clicking on the button NEXT.
In the next screen you will have to select the folders of your Google Drive cloud that you want to make available on your PC. After selecting them click the button Start.
To access the Google Drive folder from your PC, open Windows Explorer I will select the voice Google Drive found in the left sidebar. Then drag the files into this folder to automatically sync them online with your Google Drive account.
How to synchronize folders