Procedure 1: show hidden files
The first step you need to take to view hidden files in Windows 7 is to click on the icon depicting a gialla poster located on the taskbar so that you can access Windows Explorer. Alternatively, you can log in to Windows Explorer opening any folder on your PC. In the window that will now open, click on the button Organize collocato in alto a sinistra and selects the voice Folder and search options from the menu that appears to access the panel with the settings for viewing files and folders.
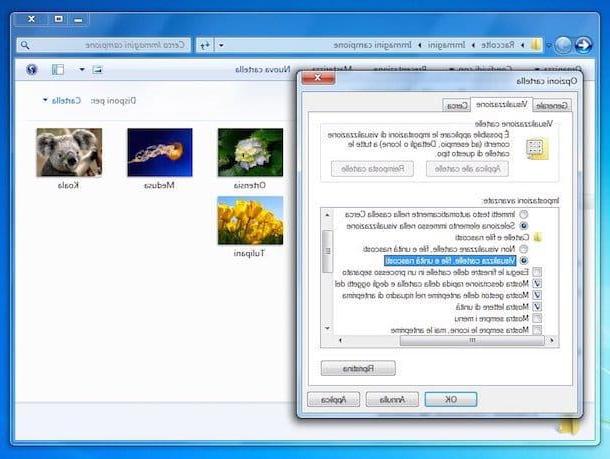
Now, click on the tab viewing contained in the window that opens, put the check mark next to the item View hidden folders, files and drives present under the heading Hidden files and folders of the section Advanced settings: and click first Apply and then OK to save the settings. By doing this, you have enabled the option to show hidden files in Windows 7. Without even having to restart your computer or exit the Windows Explorer, you will then have the ability to view all hidden files and folders.
As an alternative to the method I indicated in the previous lines, you can view hidden files Windows 7 by enabling the appropriate option using Control Panel. To do this, press the button Home attached to the taskbar, click on the item Control Panel located on the right and select the item Appearance and personalization (if you can't see it, make sure that from the drop-down menu next to the item View by: at the top right the option is selected Category).
Then click on the entry Show hidden files and folders annexed to the section Folder options. In the window that will subsequently be shown, select the item View hidden folders, files and drives present below Hidden files and folders then click on the button first Apply and then OK.
After finishing the work on the hidden files, you can make them "invisible" again by canceling the procedure previously implemented. To do this, log in to Windows Explorerclick your Organize and then presses on the card viewing. Now, remove the check mark next to the item View hidden folders, files and drives and put it back on Hide protected system files present under the heading Hidden files and folders of the section Advanced settings:. To confirm and apply the changes made first click on Apply and then OK.
You can possibly speed up the steps to be performed to cancel the procedure by which to view hidden files Windows 7 by accessing the section viewing di Folder options e pigging your pulse Restore placed at the bottom. In this case, keep in mind that in addition to the hidden files and folders of Windows 7 being again not visible, it will also restore the default view of all other files and folders of the operating system.
Procedure 2: view hidden system files
As for the hidden files protected by Windows, the procedure to be performed is roughly the same as the one just seen. In this case, I would like to clarify it, however, it is advisable to be very careful. In fact, it is enough to move, delete or modify a file that should not be touched and the correct functioning of the operating system is compromised. So proceed with extreme caution, please.
That said, to be able to view hidden files Windows 7 you need to log in to Explore Resources by clicking on the icon depicting a gialla poster present on the taskbar or by opening any other folder, press on Organize and then choose the item Folder and search options in the displayed menu.
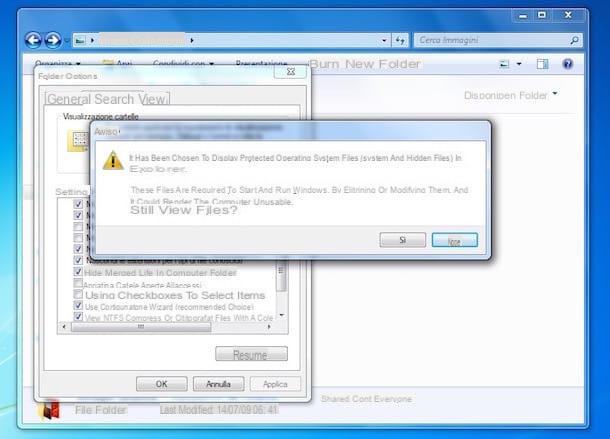
In the window that will open at this point, click on the tab viewing, remove the check mark from the box next to the item Hide protected system files (recommended) and finally presses up first Si, Then Apply and then OK to be able to save all the changes made.
Later, you can restore the Windows default settings and then make the hidden files of Windows 7 invisible again by accessing Windows Explorer . Organize and then on the board viewing. Then put the check mark again next to the item Hide protected system files (recommended) section annexed Advanced settings: and finally click on first Apply and then OK.
If you deem it appropriate, you can speed up the procedure by which you can cancel the display of hidden files on Windows 7 simply by accessing the section viewing di Folder options e pigging your pulse Restore placed at the bottom. Keep in mind that in this case, in addition to the hidden files and folders of Windows 7 being again not visible, the default display of all other files and folders on the system will also be restored.
Create hidden files
In addition to displaying hidden files Windows 7 you can make one or more elements invisible as you wish. Are you interested? Yup? Very well, then I'll immediately explain how to do it.
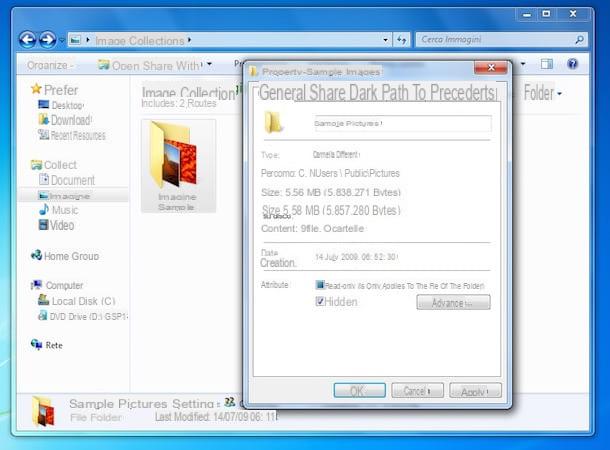
First, right click on the file or folder you intend to hide, select the item Property from the menu that appears and put the check mark on the box next to the item Hidden away in the tab General of the window that opens. To make sure that the changes made are correctly applied, first presses the button Apply and then on the button OK. Easy, right?
You can then make the file or folder that you previously chose to hide visible again by clicking on it with the right button, choosing the item Property from the displayed menu and removing the check mark from the box next to the item Hidden away attached to the card General of the window that will be shown to you on the desktop.
How to view hidden files in Windows 7