Change DNS on Windows 7
To change the DNS on Windows 7 you can act in two different ways. Based on what your actual preferences are, you can in fact modify them by intervening on the network settings or through the Command Prompt.
Either way, you have absolutely nothing to worry about - it's a pretty straightforward operation to do. To find out more, keep reading, you will find everything explained below.
From the network settings
As I told you, setting up DNS on Windows 7 is really a breeze, especially if you decide to do this by going to network settings.
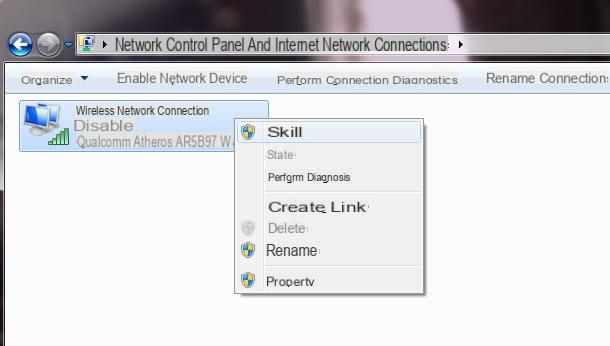
So, to do this, first you have to click on the icon of network connection located in the notification area (next to theclock Windows) and select the item Open Network and Sharing Center from the menu that appears. The network connection icon can be represented by a white monitor (if you are using a cable connection) or from white cleats (if you are using a wireless connection).
Alternatively, you can reach the section dedicated to connection settings via the Control Panel. To do this, click on the Start button (I cheer with the pennant Windows) located at the bottom left of the taskbar, click on the item Control Panel which is on the right side of the Start menu that opened and selects Rete and Internet and / or network and sharing center (depends on the type of display set).
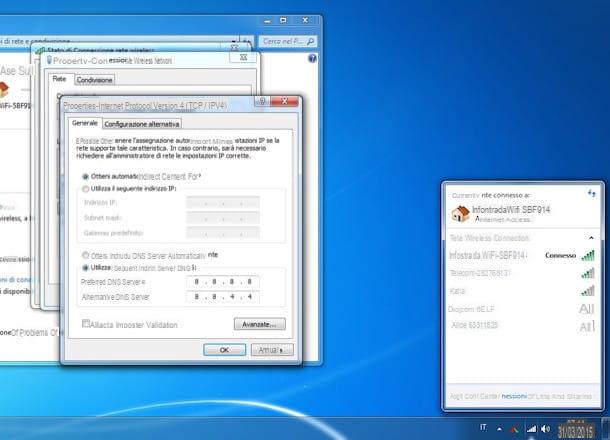
In the window that opens on the desktop, click on connection name currently in use (eg. Wireless network connection), presses the button Property and double-click the entry Internet Protocol versione 4 (TCP / IPv4) present nell'elenco The connection uses the following elements: which is located in the center of the umpteenth window that opens.
At this point, put the check mark next to the item Use the following DNS server addresses:, type in the DNS server address for the nei campi Preferred DNS Server: e Alternate DNS server: and confirm the changes by pressing OK. Facile, see?
From the Command Prompt

You can change the DNS on Windows 7 also going to act from the command line, through the Command Prompt. The thing, although apparently it may seem a little more complex than the practice described above, is actually just as simple.
To succeed in your intent, first invoke the aforementioned Command Prompt by clicking on the button Home (I cheer with the pennant Windows) which is at the bottom left of the taskbar and type, in the search field attached to the menu that has opened, Command Promptin fact.
Then right click on the first result attached to the list that is shown to you, select Run as administrator and click on Si, in order to launch the Command Prompt with administrative privileges.
Now that you see the Command Prompt window on your desktop, type the command netsh interface ip show config and press the button Submit on the keyboard. By doing so, you will be able to view the settings of all the network interfaces on your PC.
So take note of the exact name of the network interface through which it is connected to the Internet, you will need it to set the DNS by entering the next command. The name of the network interface through which you are connected to the Internet is the one you find between the quotation marks in correspondence with the first wording Configuration for the interface. For example, if you view Configuration for the "Local Area Connection (LAN)" interface allora Local Area Connection (LAN) is the name of the interface.
Enter the command now netsh interface ip add dns name=”nome interfaccia di rete” x.x.x.x index=1, taking care to replace a network interface name the name of the network interface previously identified and a x.x.x.x the DNS server you intend to set up. Then press the button Submit on the keyboard. By doing so, you have set up the primary DNS server.
Proceed by going to set the DNS server you want to use as a secondary. To do this, enter the command in the Command Prompt netsh interface ip add dns name=”nome interfaccia di rete” x.x.x.x index=2. Again you have to replace a network interface name the name of the network interface previously identified and a x.x.x.x the DNS server you intend to set up. Then press the button Submit sulla tastiera of the computer.
Mission accomplished! You have finally managed to set up DNS on Windows 7 from the Command Prompt! To confirm the success of the operation, enter the command again netsh interface ip show config in the Command Prompt window, press the key Submit on the computer keyboard and check what is written next to the item DNS server set statically:, in the section relating to the network interface in use. If everything went well, you will find the DNS servers you have chosen to set up using the commands above.
Change the DNS from the router
In addition to how I explained to you in the previous lines, you can change the DNS in use by acting from the router. In this case, however, I would like to clarify it, the DNS set will not only be valid for your PC with Windows 7 installed but also for all other devices that may be connected to the same router.
To succeed in the enterprise you have to put your hand to control panel of the modem. To do this, open the browser you generally use on your computer to surf the net (eg. Chrome), type theIP of the modem in the address bar and press the key Submit sulla tastiera from the PC.
In most cases, the router's IP address is 192.168.0.1 or 192.168.1.1 or again, 192.168.1.254. If an error message appears when typing the coordinates I just provided you, try to locate the correct IP by reading the instructions on what to do that I gave you in my tutorial on how to find the router IP address.
After entering the correct IP of the router, if a window appears asking you to type username and password to access the control panel, try entering the combination admin / admin or admin / password, are the default for most modems. If the combinations I have given you do not turn out to be correct and therefore you are having difficulty logging in, read my tutorial on how to access the router to find out how to deal with it.
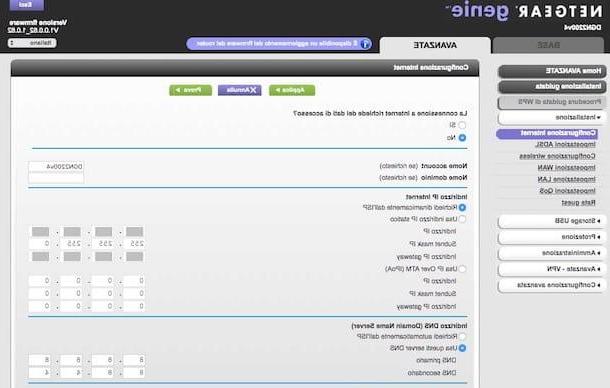
Once logged in, go to the section relating to connection configuration, select (if necessary) the option for use certain DNS servers instead of those provided by the ISP and locate the items DNS 1 or Primary DNS e DNS 2 or Secondary DNS.
Finally, fill in the information you find in correspondence with these entries with the DNS servers you want to use and click on the button Apply, OK o Save to save and apply the changes (the router may reboot). Since it wasn't difficult?
Find the best DNS servers
Now that you finally have perfectly clear ideas on how to proceed to be able to change the DNS on Windows 7 I am more than sure that you are wondering: what are the best DNS?
To answer your question, you need to start from a fixed point: there are many companies that offer public DNS servers and which you can rely on to speed up and protect your online "raids" for free. Below you will find the most prominent ones you can refer to.
Main DNS servers

Among the various companies that offer public DNS servers that can be exploited without constraints by users, it is certainly worth mentioning Google, CloudFlare ed OpenDNS.
The DNS servers of Google and Cloudflare are known above all for their speed and for the fact that, being international, they also allow access to sites that are blocked by cittàn providers.
Cloudflare's also offer an advantage in terms of privacy, as they promise not to store the data of the sites visited by users.
Those of OpenDNS are also fast, they also allow access to blocked sites in the city, but are exploited above all for their parental control function through which it is possible to inhibit the display of certain categories of sites: social networks, sites for adults only, gaming sites, Web Mail services and much more.
To activate the DNS of one of the three companies mentioned above, you just need to put into practice the instructions I gave you in the previous lines and type in the following addresses if necessary.
Google DNS Server
- Primary DNS Server: 8.8.8.8
- Secondary DNS Server: 8.8.4.4
DNS servers at Cloudflare
- Primary DNS Server: 1.1.1.1
- Secondary DNS Server: 1.0.0.1
DNS server at OpnDNS
- Primary DNS Server: 208.67.222.222
- Secondary DNS Server: 208.67.220.220
Alternative DNS servers
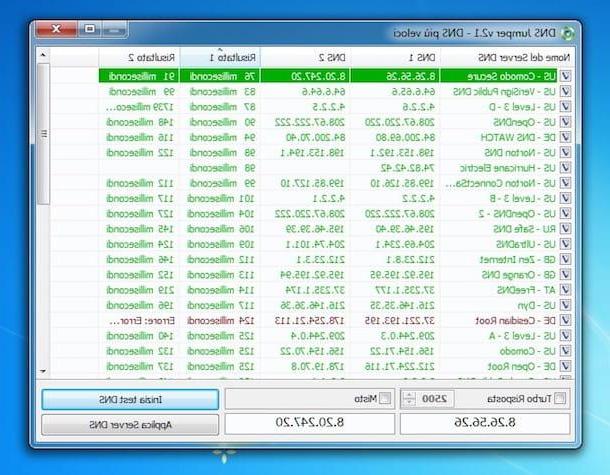
Considering that there are many DNS servers and that in addition to those already mentioned there are also others that can prove to be very valid, I strongly suggest you rely on the use of DNS Jumper. It is a free and no-install program for Windows designed to identify the best performing DNS for the connection in use as well as for the geographical location of reference.
To download it to your computer, first connect to the download page of the program on Softpedia, click on the button Download now located at the top left and select the link Softpedia Secure Download (US) in the window that appears on the screen.
When the download is complete, open the ZIP archive containing the application, extract the contents in any location and start the executable DnsJumper.exe.
Nella finestra che si apre, click on your button Yes, select your PC's network card from the drop-down menu Select a network card and click on the button first Faster DNS and then Start DNS test.
Then wait for the software to evaluate the performance of all selected servers. When the operation is completed, take note of the DNS servers that the program has identified as the fastest (you can find them listed in the fields below) and set them on your computer as I indicated in the previous lines.
If you prefer, you can also have the program automatically set up the newly detected servers on your PC. To do this, click on the button Apply DNS Server.
How to change DNS Windows 7