What are DNS

As anticipated at the beginning, to begin with I would like to explain what exactly these DNS are, or rather DNS server. Without going around it too much, they are a kind of "intermediaries" between us and the Internet sites we want to visit.
It is in fact thanks to them that we can visit, for example, Google by simply typing google.en or google.com in the address bar of the browser instead of the IP address of the search engine, which would be a very long string of numbers (which would then be the real coordinates of the reference site).
Typing each time the IP address of a website would be practically impossible to remember as well as definitely an impractical operation to do a search "on the fly" on the net. In short, as you can see for yourself, they have their great utility!
DNS servers are not unique, there are tons of them available in the world, and each of them offers different performances. Changing them, choosing faster ones and perhaps respectful of privacy, can be useful to reduce the response times of Internet sites, thus speeding up their opening. It also allows access to those portals for which the local provider may have imposed blocks.
What are the best DNS

But what are the server DNS IPv4 most popular currently present on the square? The answer is soon given! There are those of CloudFlare, those of Google and those of OpenDNS. You will find them all listed below.
DNS servers at Cloudflare
- Default DNS Server: 1.1.1.1
- Alternative DNS server: 1.0.0.1
Google DNS Server
- Default DNS Server: 8.8.8.8
- Alternative DNS server: 8.8.4.4
DNS servers at OpenDNS
- Default DNS Server: 208.67.222.222
- Alternative DNS server: 208.67.220.220
Those of CloudFlare and Google they are famous above all for their speed and for the fact that, being international, they also allow access to sites that are blocked by cittàn providers. Furthermore, those of Cloudflare promise a greater degree of privacy, not keeping the data of the sites visited by users stored.
Even those of OpenDNS they are fast enough and allow you to access blocked sites in the city, but are used primarily for their parental control function through which you can inhibit the display of specific categories of sites (e.g. sites for adults only, sites dedicated to betting etc.). Read more here.
However, considering that, as already mentioned a few lines above, there are many DNS servers and that in addition to those mentioned there are also others that can prove to be very valid, if you want advice to find more you can rely on those that you I indicated in my guide dedicated to the topic. In this article of mine I have in fact provided you with a bunch of additional special tools that can help you identify the best performing DNS servers.
Change DNS on Windows 10
Now that you finally have a clearer idea about the nature of DNS servers, I would say that we can finally get to the very heart of the matter and try to figure out how to change them to Windows 10.
To do this, you can take two different paths based on what your preferences are. You can choose to act from the Windows settings or from the Command Prompt. The final result will be identical in both cases.
Standard procedure
If you have chosen to change DNS on Windows 10 acting from the system settings, the first step you must take to succeed in your intent is to click on the button Home (the'flag icon located on the taskbar) and then select the item Settings (marked with the gear icon) in the menu that is shown to you.
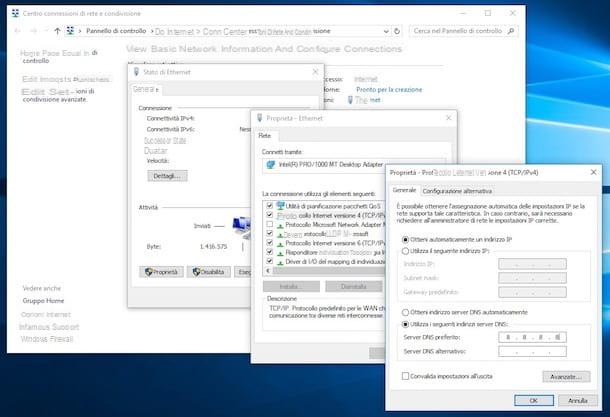
In the Windows 10 settings panel, select the items Network and Internet> Change adapter options and choose the name of the connection in use in the screen that is shown to you. For example, if you want change Windows 10 DNS to Wi-Fi choose the named network Wi-Fi; for that LAN, however, it is generally named Ethernet.
After locating the network card, right click on it and choose the entry Property in the context menu. Now, locate the wording Internet Protocol versione 4 (TCP / IPv4) in the screen you see: make sure that the relevant box is checked (if not, you can do it yourself), click on the button Property that you find at the bottom and activate the box Use the following DNS server addresses.
Finally, type the address of the DNS servers you intend to use in the fields next to the entries Preferred DNS Server e Alternative DNS Server, put the check mark on the box that you find next to the wording Valid impostazioni all'uscita and click sul pulsating OK to save and apply the changes made. Done!
For example, for change Windows 10 DNS with Cloudflare, in the box Preferred DNS Server finger 1.1.1.1, While in Alternative DNS Server indicates the value 1.0.0.1; check the box Valid impostazioni all'uscita I awarded her OK.
If you then wish to change the DNS servers set on Windows 10 again, you can change them at any time and as often as you want by simply carrying out the procedure I have just reported to you from scratch.
If, on the other hand, you have second thoughts and want to make sure that your PC with Windows 10 installed automatically acquires the DNS servers of the Internet provider of the connection you use (or in any case those set in the modem / router), simply check the item Ottieni indirizzo DNS server automatically after selecting the item Internet Protocol versione 4 (TCP / IPv4) and after clicking the button Property after choosing the connection in use in the connection center of the system.
Alternative procedure
If you prefer instead change DNS on Windows 10 acting through Command Prompt, first access it by clicking on magnifying glass attached to the taskbar at the bottom left.
Now, type in the terms "Command prompt" in the search box that is shown to you and right-click on the relevant result, then selecting Run as administrator from the context menu. This will start the Prompt with higher permissions.
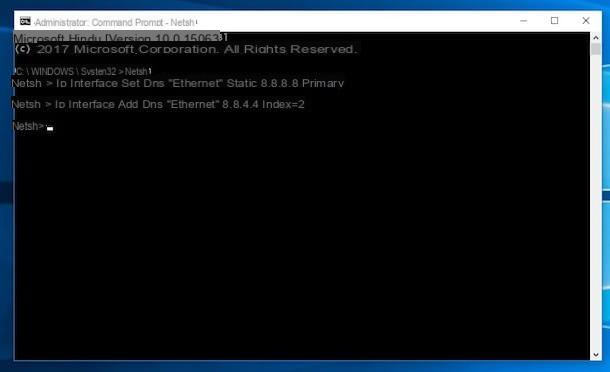
Once it displays the Command prompt on the desktop, type the command netsh and press the button Submit on the keyboard. Next, type the following command.
interface ip set dns name = “network interface name” static [DNS server]
Instead of network interface name you must enter the name of the reference network interface. Instead of [server DNS] you have to type the primary DNS server you want to use. Then press the button Submit on the keyboard to set the primary DNS server to the desired one. Then type the following command.
interface ip add dns name = “network interface name” [DNS server] index = 2
Again replace a network interface name the name of the reference network interface ea [server DNS] the secondary DNS server you want to use. Press the Enter key to set the secondary DNS server as well.
The changes you make will be applied instantly. So close the command prompt window and you can immediately start surfing the net from your Windows 10 PC using the set DNS servers.
How to change DNS Windows 10 IPv6
What I explained to you in the previous chapter is related to the protocol IPv4. If your network provider supports the IPv6 and it has been enabled on your line, you must then use DNS servers in IPv6. You may be wondering what the difference is between the two protocols. The answer is soon said!
To simplify the discussion, you must know that IPv4, being 32-bit, allows you to generate about 4 billion unique addresses. You can understand that, given the websites and portals generated around the globe, you don't have a lot of IPs to assign. In this case, IPv6 comes into play, which exponentially increases (2¹²⁸) IP addresses (there are so many!).
As for the best DNS services that I mentioned in this chapter, you can always refer to those mentioned, taking care, however, to use the correct DNS servers, which you find below. You can check if your Internet line is in IPv6 by reaching this link and viewing the response that is given to you on the screen.
DNS servers at Cloudflare
- Default DNS Server: 2606: 4700: 4700 :: 64
- Alternate DNS Server: 2606:4700:4700::6400
Google DNS Server
- Default DNS Server: 2001: 4860: 4860 :: 8888
- Alternate DNS Server: 2001:4860:4860::8844
DNS servers at OpenDNS
- Default DNS Server: 2620: 119: 35 :: 35
- Alternate DNS Server: 2620:119:53::53
That said, to change the DNS servers you have to proceed in the same way as I explained to you in this chapter regarding the standard procedure on Windows 10.
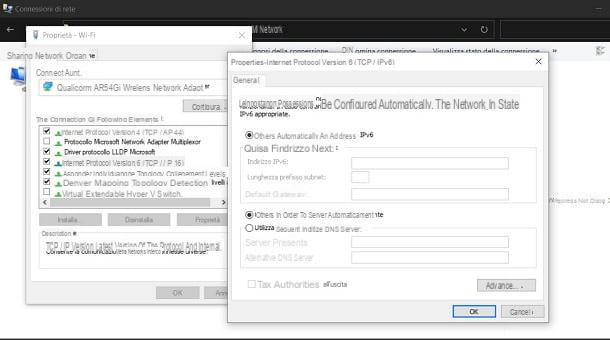
Therefore, in the configuration panel of the network card, select the item instead Internet Protocol versione 6 (TCP / IPv6) and then type, in the editable boxes by ticking the option Use the following DNS server addresses, the DNS servers in IPv6 mentioned above.
How to change Windows 10 DNS from router
You must know that it is not necessary to change the DNS by acting from the settings of your computer, but you can also proceed directly from router. In this way, you will not only change the DNS for your Windows 10 PC, but also for any device that you connect to your local network.
Obviously, this procedure is valid only if your router supports DNS management and, therefore, I invite you to check the user manual of your network device. That said, log into your router's admin panel (if you don't know how to do this, see this article) to proceed!
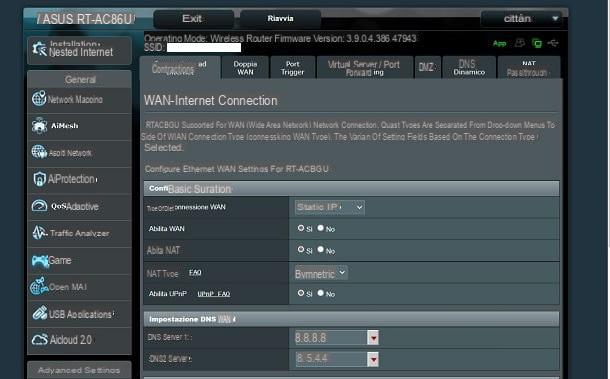
I warn you that each router has its own web interface and, therefore, the procedure that I will show you may differ depending on the network device in your possession. For this tutorial of mine I have relied on mine ASUS router Series RT.
After logging in to the router, select the entry for WAN from the main menu and locate the section forDNS WAN setting. Now what you have to do is type the DNS servers in the boxes below or select them from the appropriate drop-down menus.
In the case of an IPv6 network, select the item IPv6 from the drop-down menu and locate the section IPv6 DNS setting to populate it with the IPv6 DNS servers of your choice.
In case of problems

If you have changed the DNS from your Windows 10 computer, in order for the settings to be captured, you may also need to clear the DNS cache of the system. In fact, in some cases errors may occur that do not allow you to see improvements while browsing the Web despite the changed DNS.
To fix this, you need to open the Command Prompt: From the search bar in the taskbar, type "Command prompt" and right-click on the appropriate result, then selecting the item Run as administrator, from the menu you see.
At this point, in the screen that is shown to you, type the command ipconfig / flushdns, followed by pressing the key Submit on the keyboard to run it. By doing so, the system's DNS cache will be emptied and rebuilt with the new DNS data previously entered.
How to change DNS Windows 10