Do you have a Raspberry Pi and controllers on hand? Install Recalbox on it to emulate all the classic video games and turn your RBPi into a retrogaming console. Follow our guide to make your own home console in just fifteen minutes!
RecalBox: a retro Raspberry Pi console in 15 minutes
To make your retro Raspberry Pi console in 15 minutes, it's very simple. The trickiest part is transferring recalboxOS to your SD card and plugging the Raspberry Pi into your TV. It shouldn't take you more than XNUMX minutes before you can play your favorite games.
Equipment
To be able to play games with your Raspberry Pi, you need:
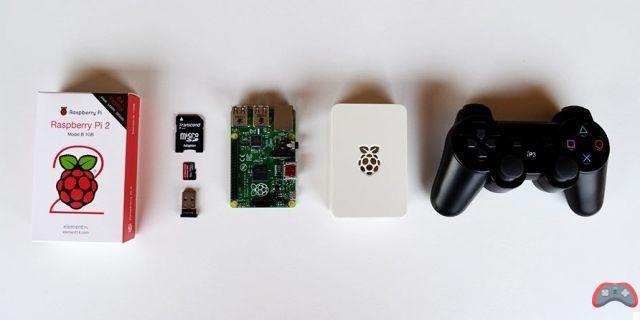
- 1 Raspberry Pi
- 1 (or 2) USB, PS3 (Sixaxis or Dualshock 3), ShanWan, or Xbox360 controllers
- 1 microSD card of at least 16 GB
- A micro USB cable and a power supply of at least 1,5A
- A good quality bluetooth dongle (optional)
- A compatible wifi dongle (optional)
- A case to protect your Raspberry Pi
- A USB keyboard
How to install recalboxOS?
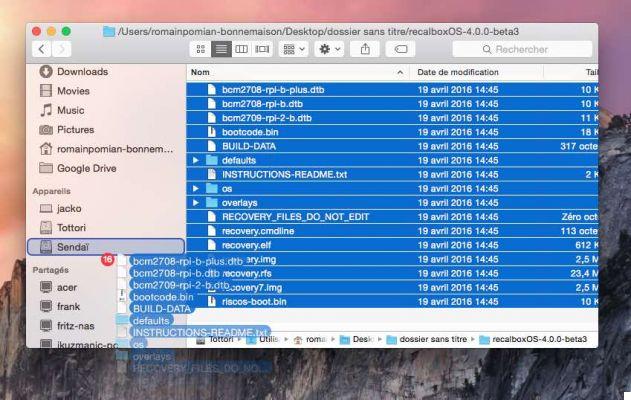
- Download the latest version of recalboxOS by clicking on this link
- Format your SD card to FAT32 via SD Formatter 4.0 if you are on Windows and Mac or by the Gparted tool under Linux. In the latter case, you can use the Linux part of our How to format a hard drive guide.
- Unzip recalboxOS
- Copy files to formatted SD card
- Insert the SD card into your Raspberry Pi
- Connect the HDMI, keyboard then the power supply

The rest of the procedure is fully automated. As soon as your Raspberry Pi turns on, the files contained on the card will be installed, which can take around ten minutes.
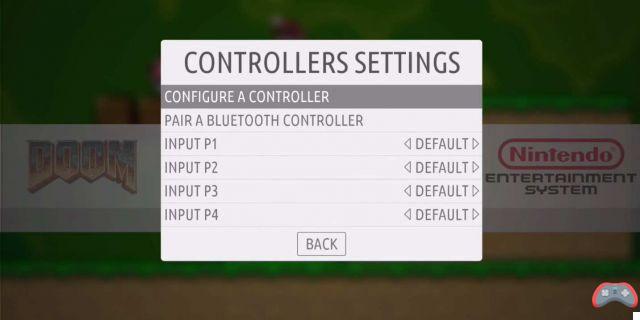
Configure your controller with recalbox
Here you will see, nothing very complicated, recalbox takes care of everything! In most cases, all you need to do is plug in your controller and you can start using it. For bluetooth controllers, you must insert your bluetooth dongle and proceed as follows:
- Connect the controller via USB and wait 10 seconds
- Unplug and press the button Home
If this option does not work directly, go to the main menu then Configure Input > Configure a controller. Then click on Pair a bluetooth controller to initiate pairing of the controller.
If you only have a USB keyboard at hand, then again, you may need to configure the keys you want to use for control. After plugging in the keyboard:
- Press the key Starter
- Select Configure Input and confirm with the S key
- Select Configure a controller and confirm with the S key
- Follow the instructions to assign your keyboard keys
Transfer your favorite games
The transfer of games to recalboxOS is carried out directly via the network. No need to try to transfer the games directly to the card: this has the effect of causing a bug that prevents you from enjoying your game. If your recalbox is connected via Ethernet, it should normally connect to the network on its own. If necessary, here is how to configure it in Wifi:
- In the main menu go to Network Settings
- Put the name of your network in Wifi SSID
- And your wifi key in Wifi Key
- Select back to confirm
You can now return to your computer and transfer the ROMs of your favorite games. NB: recalboxOS shares its Roms folder via the SMB/Samba protocol, a priori installed by default whether on Mac or on the most recent versions of Windows. This is not necessarily the case, initially, on Ubuntu. In case of problem, consult our Windows, Mac, Linux tutorial, how to share your files easily.
Windows
- Go to theFile Explorer
- Go to Network
- Select the RECALBOX network folder
- If you can't find the folder, go back to your Recalbox, go to the menu, then Network Settings and write down the IP address
- On Windows, type in any explorer window ip_address
- Transfer the rom(s) to the folder corresponding to the console
Mac
- Open a Finder window
- RECALBOX should be visible in the left column in the section Appareils
- Open the folder and transfer the rom(s) to the folder corresponding to the console
Linux
As on Mac, and if Samba is installed:
- Open a file explorer window
- In the left column you should see RECALBOX
- Open the folder and transfer the rom(s) of your choice
Your games have finally transferred! Now you have to tell recalboxOS to update its list of games, which you can do simply by going to the main menu, then Games Settings > Update games lists.
- To read also: A PS4 hack to install pirated games on the hard drive
Here you are with a perfect retrogaming console in your living room. Enough to have fun for a long time, make you discover new games and certainly tickle the curiosity of your friends! Above all, if you are a handyman, you may be able to use this technique to put a good alternative to the NES Classic Mini, which is chronically out of stock, under the tree!
The editorial advises you:
- How to install a Linux virtual machine in Windows 10
- Word: how to put a single page in landscape mode