Preliminary operation
Before we get to the heart of the tutorial, there are a few preliminary operations that you have to accomplish to succeed reset Windows 7 correctly and without encountering any hitches. For more information, read on: everything is explained below.
Back up your data

Before resetting Windows 7, I recommend that you first perform a backup of the data saved on the computer: which will allow you to continue to have access to your files even after the formatting procedure which, as known, deletes the entire contents of the partition or disk on which the operating system is installed.
To do this, get a external hard disk (if you do not yet have a device of this type, you can consult my buying guide to clear your ideas on which model to buy) and transfer your personal files to it, following the instructions I gave you in my tutorials on how to transfer files to external hard drive and how to make a data backup.
Get the Windows ISO image
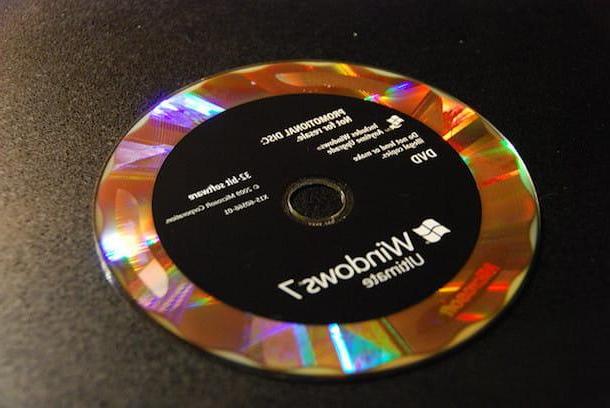
Another thing you need to do before taking the actual action is to find theWindows 7 ISO image.
If you own the installation disk of the operating system, you do not have to do absolutely anything, as what you need is already in your possession and you can directly use the support in question.
If you don't have the Windows 7 installation disk at your disposal, you can download its ISO image via the Microsoft website. In this case, however, keep in mind that the operation is feasible only and exclusively if you already own a product key Windows 7 valid and most importantly only if you have one retail version operating system, i.e. if you purchased the license separately from your computer, in physical stores or online. The thing, therefore, is not feasible if you have one OEM license, that is, if you found your copy of Windows already installed on your PC.
That said, if you have the necessary requirements to be able to download the Windows 7 ISO from the Internet, visit the relevant web page, type your product key in the appropriate field located at the bottom, click on the button Verifica and follow the on-screen instructions. For more information, you can refer to my specific guide on how to download Windows 7.
After finding the Windows 7 ISO image, masterizzala your DVD using one of the special tools used for the purpose that I reported to you in my guide on how to burn ISO files. Alternatively, you can create one bootable USB stick, as I explained to you in the passage on the subject in the final part of this guide.
Configure the BIOS
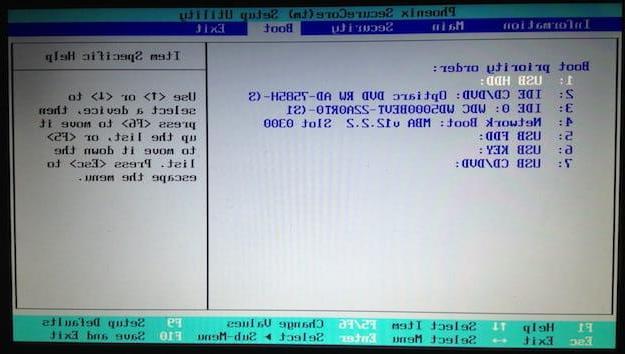
Another operation that you must do in advance is to correctly configure the BIOS, changing the boot order of the computer, so that the CD / DVD player or USB port of the computer starts before the hard disk.
In this regard, keep in mind that if the PC you want to act on is based on theUEFI (i.e. the most advanced and updated version of the BIOS) and you need to reset a copy of Windows 7 32-bit, it is necessary to take advantage of the function Legacy BIOS (which allows you to emulate the old BIOS).
Again in the case mentioned above, it is necessary to proceed with the deactivation of the Secure Boot (this is the security function that prevents the execution of operating systems without a specific digital signature). Find all the details of the case on how to do the aforementioned operations in my guide on how to enter the BIOS.
Reset Windows 7
After taking the preliminary steps above, you are finally ready to take action and reset Windows 7.
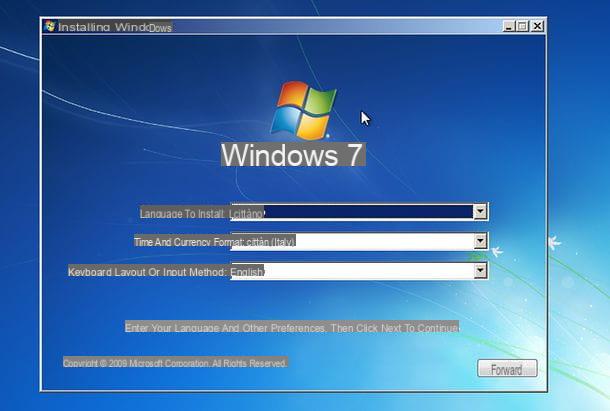
To begin with, then turn on the computer on which you want to go to act (if you had not already done so), insert the installation disk of the operating system, restart your PC and wait for the boot from the DVD.
Now that you see the initial Windows 7 setup screen, make sure that it corresponds to the drop-down menus Language to install, Time format and currency e Keyboard layout or input method the correct options are selected (otherwise you can do it yourself) and click the buttons NEXT e Install, to proceed with the installation of the OS.
On the next screen, select (if required) the edition of the operating system you want to install (eg. Windows Home Premium 7 x64) and click the button again NEXT, then put the check mark next to the item I accept the license conditions and click on the button again NEXT.
Adesso, premium pulsating Custom (Expert users), then click on the item Advanced drive options located at the bottom right, select all the listed partitions and click on the button first Format, always located at the bottom, and then on that OK located in the center, in order to format the hard disk on which the system is installed.
After that, press the buttons again NEXT e OK and wait for the Windows 7 installation procedure to start and complete. Note that this will take several minutes and the computer will automatically restart several times.
Once the setup is complete, the first system boot wizard will start: you will then need to configure your user account, you will need to enter the product key of the operating system and you will have to define which ones security related settings use and the network type to employ.
After completing the above steps, you will finally find yourself in front of the Windows 7 desktop and you can finally start using your PC as usual and restore your data and programs. For more details, you can check out my specific article on how to install Windows 7.
Restore Windows 7 without CD
Don't have an operating system installation disk? If so, you can restore Windows 7 without CD, creating a bootable USB stick with the ISO image of the OS.
To succeed, first get one pendrive with a capacity of at least 4 GB. If you don't have a dongle yet, you can read my buying guide to find out which model is best for you. Also keep in mind that the pendrive must be empty or in any case containing irrelevant data, as it will be formatted.
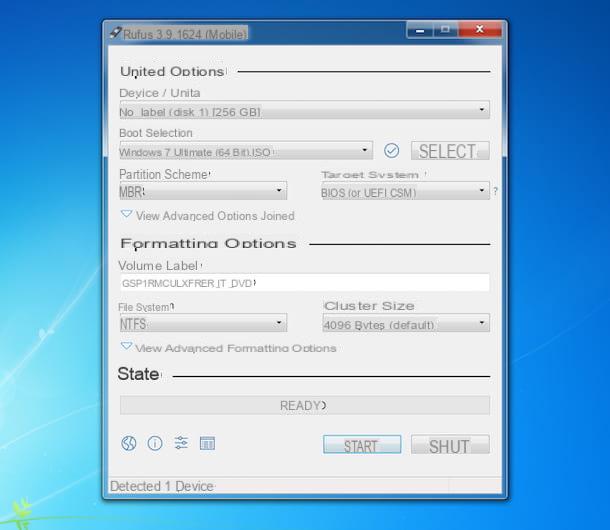
Afterward, worry about downloading Rufus: a free software that does not require installation, which allows you to create bootable USB drives with Windows or Ubuntu. To download, visit their website and click on the link Rufus xx Portable che trovi in corrispondenza della sezione Download.
When the download is complete, open the .exe file obtained and, in the window you see appear on the desktop, click on the button Yes. Then press the button Yes, to check for updates, then connect yours pendrive to one of the USB ports of the PC and make sure that this is selected in the drop-down menu Device / unit at the top of Rufus' screen (if not, you can do it yourself).
At this point, choose the option Disc image or ISO (select) from the drop-down menu located under the heading Boot selection, click here Select adjacent and select the ISO file Windows 7 that you previously got yourself.
Finally, make sure the items are selected MBR in the section Partition scheme e NTFS in the section File System, dopodiché clicca sul pulsating starts and wait for the procedure to create the pendrive with Windows 7 is started and completed.
After that, you can proceed with installing the operating system on your computer. So, if the PC you are interested in working on is the one currently in use, leave the key connected and restart it. If, on the other hand, you have to go and act on another computer, disconnect the pendrive, connect it to the PC of your interest and restart it (or turn it on, if off).
When you see the initial screen to start the installation of Windows 7, all you have to do is follow the instructions I gave you in the previous step, to complete all the procedure correctly. For more details, you can check out my guide dedicated specifically to how to download Windows 7 to USB.
Reset Windows 7 without formatting
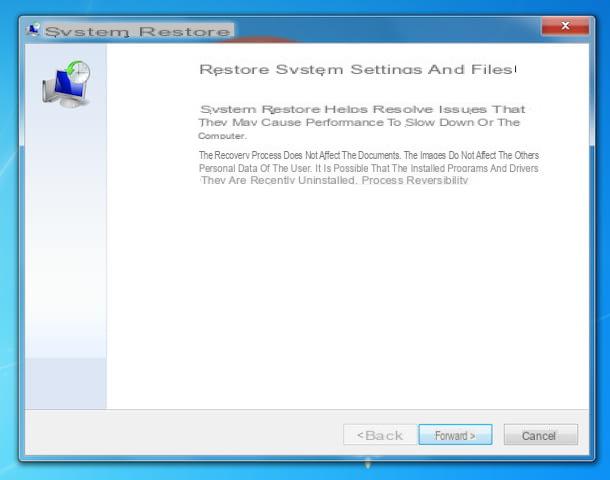
As I told you at the beginning of the guide, it is also possible reset Windows 7 without formatting the PC. How? Simple: by exploiting the restore points, which allow you to restore the system to a previous state, leaving your personal files intact and deleting only the programs (or drivers) installed at a later date than the chosen restore point.
To use it, therefore, click on Start button (I cheer with the windows flag) che trovi nella part in fund to sinistra della taskbar, write "System restore" in the search field attached to the menu that has opened and select the suggestion relevant.
In the window that opens on the screen, click on the button NEXTselect il restore point to which you want to return the computer (if necessary, you can help you find the correct restore point by looking at the date and time you find in the table, as well as the description of the associated operation) and click on the button again NEXT. If you see fit, you can also view older restore points by ticking the box Show additional restore points which is located at the bottom.
In the summary screen that will be shown to you, make sure you have selected the correct restore point, viewing what is reported in the fields Time, Description e Unit and, if you want to get a list of programs / drivers that will be deleted and those that may need to be reinstalled later, click on the entry Look for interested programs.
To conclude and to start the actual recovery process, click on the button end. When the operation is complete, the computer will restart and return to the state it was in at the date and time you specified. For more information, you can read my specific guide on how to create a restore point on Windows 7.
How to reset Windows 7