Preliminary operation
Before getting to the heart of the tutorial, let's explain in detail how to activate microphone on windows 10, there are some preliminary operations that must be done to ensure that everything goes the right way.
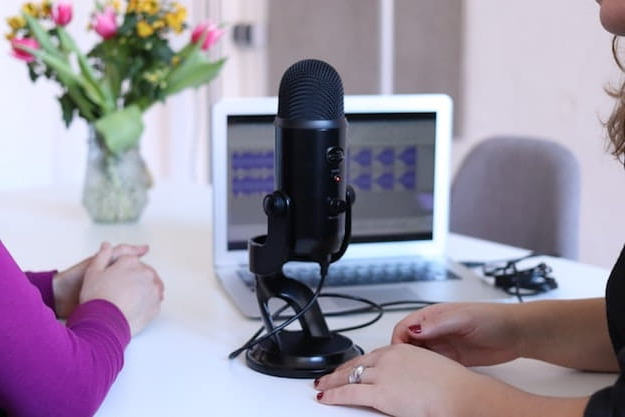
Let's start by saying that the microphone can be either integrated directly into the computer (as is often the case with laptops) that external (which is more common for fixed PCs). In the first case no connection is required, while in the second it is first essential to connect the microphone to the PC via cable or by half wireless, depending on the supported technology.
If what you have is a wired microphone, just insert the plug into the input jack from 3,5 mm dedicated to the purpose you find on the computer case. It is easily recognizable as it is marked by color pink and / or the icon of a microphone or from the writing Small. If the microphone is also (or only) equipped with a cable USB, you can connect it to the computer via the latter, by inserting it into the appropriate socket on the PC.
There are also microphones equipped with different attacks, which must be connected directly to the audio card or for which it is necessary to resort to the use of specific adapters, while as regards the “wireless” microphones, the connection with the computer must in any case be made by means of a cable to the relative one receiving base.
Once the connection between the microphone and the computer is established, it may be necessary to install the related ones driver e supporting software to use it correctly. So, also make sure you have installed on your PC all the solutions necessary for the correct functioning of the microphone, perhaps using one of the missing driver programs that I recommended in my guide on the subject.
Even in the case of integrated microphones, it is always a good idea to make sure that the drivers installed are the most up to date. If you don't know how, you can find out by reading my tutorial on updating drivers.
How to activate the PC microphone on Windows 10
Having made the necessary clarifications above and after having completed the necessary preliminary operations, I would say that we can finally get to the heart of the tutorial and go to find out, in practice, how to activate the microphone on Windows 10.
As much per cominciare, fai clic sul Start button (I cheer with the windows flag) which is located at the bottom left of the taskbar and select the icon of Settings (Quella a forma di ruota d'ingranaggio) present in the menu that opens.
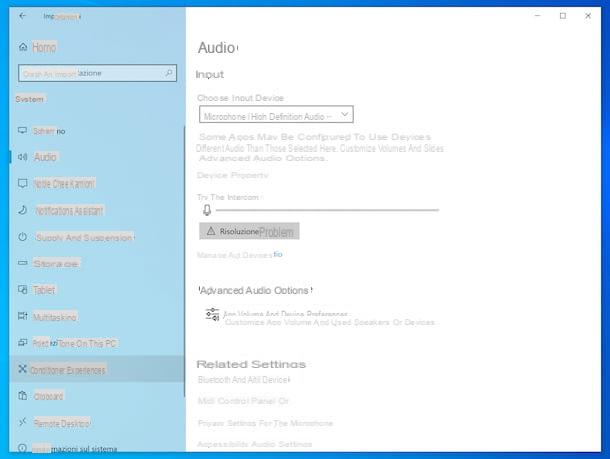
In the window that you now see on your desktop, select the item Systemwho quills Audio that you find in the left side menu and scroll the right part of the screen, until you reach the section Input. At this point, select (if necessary) the name of the microphone give menu to tendin Choose the input device And that's it.
If you don't see the microphone in the menu, first enable it. To do this, click on the item Manage audio devices, then on the name of the microphone present under the heading Input devices on the next screen and press the button Enable.
Next, to test that the microphone is receiving input correctly, try speaking through the device or making sounds in the room it is in and check that the bar below the wording Test the microphone, which is located a little further down in the part of the screen, is colored in conjunction with the reproduction.
If you deem it necessary, you can also access the microphone configuration panel by clicking on the entry Device properties. Using the new screen displayed, you can rename the microphone by filling in the text field at the top and then pressing the button Rhinomine and you can adjust the volume by moving the scroll bar that you find under the heading Volume.
To access the advanced settings, instead, click on the link Additional device properties and, in the new window displayed on the desktop, take action on the options available in the tabs General, I listen, Layers e Advanced to adjust the preamp level, to prevent the microphone from disconnecting automatically when the computer is not connected to the power outlet (if it is a notebook) etc. To save any changes made, click on the buttons Apply e OK.
If this is useful for you, I inform you that you can also manage the generic audio options related to applications. To do this, click on the wording App volume and device preferences that you find in the section Settings> System> Sound Windows 10 and use the available control bars and drop-down menus to set the master volume and application volume.
Should you encounter any problems related to the use of the microphone, click on the button Solving problems che trovi in corrispondenza della dicitura Input, always in the section Settings> System> Sound Windows 10, and follow the wizard for the detection and resolution of any problems identified that is proposed to you on the screen.
How to activate the headset microphone on Windows 10
You are wondering if it is possible enable the headset microphone on Windows 10, so as to use the latter as an input device? The answer is yes. To do this, first click Start button which is located at the bottom left of the taskbar, then select the icon of Settings present in the menu that opens (the gear icon).
In the window that you now see on your desktop, select the item Systemwhy are you cheating? Audio present in the left side menu, scroll the right part of the screen until you reach the section Input and select (if necessary) the name of yours headphones give menu to tendin Choose the input device. Here it is!
If you do not find the name of your headphones in the menu, it is evidently because you must first take another preliminary step: enable the use of the microphone that the device is equipped with. To do this, click on the wording Manage audio devices and, on the next screen, select the name of the headphones that you find under the heading devices, then press the button Enable.
The rest of the operations to be carried out to test the correct functioning of the microphone are practically similar to those I described to you in the previous step. For further information, you can also refer to my guide on how to activate the microphone of the headphones.
Keep in mind that the information I gave you in this chapter can also be used for enable Windows 10 webcam microphone.
How to activate the microphone in applications on Windows 10
As for the possibility of enable the microphone in applications on Windows 10, know that one must be implemented different procedure depending on the program used. Consequently, I cannot provide you with specific and detailed information for each of them.
In principle, however, you need to access the settings of the software and intervene in the section relating toaudio or sound. If this can help you, below you will find some practical examples, related to Skype a Chrome, which are two of the most popular and used computer programs.
Enable Skype Microphone on Windows 10
You would like to activate the microphone on Windows 10 when using Skype but you don't know how to do it? So, to start with, start the program on your computer, selecting the relevant one collegamento that you find in Start menu, then log in to your account (if necessary), click the button (...) located at the top left and choose the item Settings give the menu to compare.
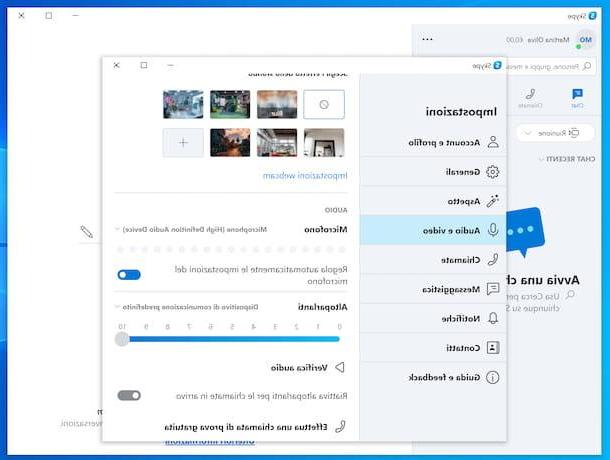
In the further window that is shown to you at this point, select the item Audio and video found in the left side menu, locate the section Audio on the right and select (if necessary) the name of your microphone from the drop-down menu Microphone.
Then, if you want to have the settings related to the operation of the microphone automatically adjusted, bring up ON l'interruttore che trovi accanto alla voce Automatically adjusts the microphone settings. If, on the other hand, you prefer to manually define the aforementioned settings, carry on OFF the lever and move the cursor over the adjustment bar that appears to adjust the sound.
To check that you have set the microphone to work correctly, click on the item Make a free trial call to make a test call, then follow the instructions of the voice guide.
If, on the other hand, you have correctly enabled the microphone in the Skype settings, but during the calls and video calls that you make your interlocutors cannot hear your voice, it is evidently because you have disabled its use during conversations. To fix it, click on the icon with the microphone that you find at the bottom of the call screen, so that from Grey you become colored White.
If proceeding as I explained above you are still unable to activate the use of the microphone, make sure you have granted the necessary permissions to the Skype application in the Windows 10 settings. To make sure of this, click on the Start button that you find at the bottom left of the taskbar, click on the icon Settings present in the menu that appears (the gear icon) and, in the window you see on the desktop, click on the item Privacy.
Successively select the voice Microphone from the left side menu, then make sure that on the right there is the wordingmicrophone access for this device is enabled. If not, click on the button Modification placed a little lower and move up On the switch that appears.
Afterwards, make sure the switch under the heading Allow apps to access the microphone that you find on the right is moved to On (others provide you) and carry on On (if necessary) also the lever at Skype in the list of applications present a little further down.
If you think you need more explanation, you can consult my specific guide on how to activate the microphone on Skype.
Enable Chrome Microphone on Windows 10
The microphone on your Windows 10 PC seems to work with all applications except the Chrome? Then, to solve, open the program in question, click on the button with the three dots vertically placed in the upper right part of the window and choose the item Settings give the menu check if you press.
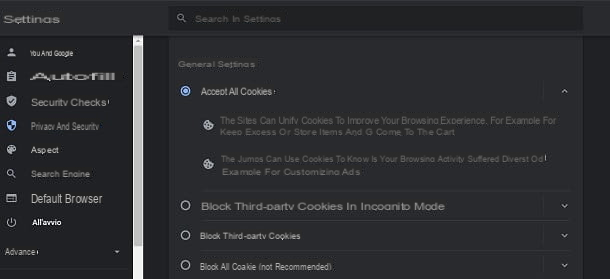
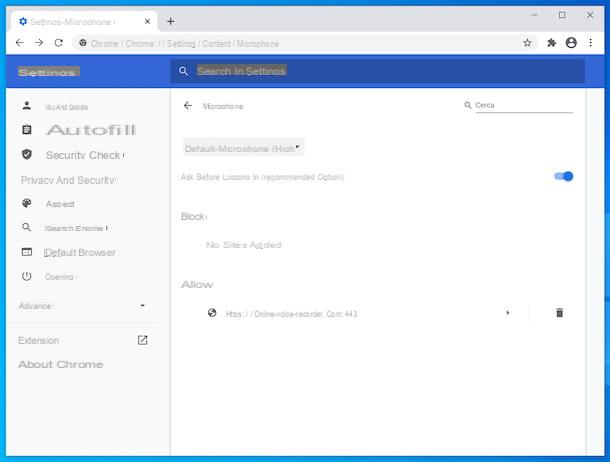
In the tab that is now shown to you, select the wording Site settings che trovi in corrispondenza della sezione Privacy and security, then click on the wording Microphone present nella sezione Permissions.
On the next screen, select (if necessary) the name of yours microphone from the drop-down menu at the top. If you then want to make sure that every time you need to use the Chrome microphone, it asks you in advance for permission to use it (recommended), move to ON the lever located at the top, to make the wording appear Ask before signing in (recommended).
Afterward, make sure that in the list Block the Internet sites for which you intend to use the microphone and which in that are not listed Allow there are no sites for which, however, you do not want to use it. If necessary, you can change one or the other by clicking on the site name and selecting the option Ask, Allow or Block give menu to tendin Microphone on the next screen.
If you deem it necessary, you can also remove a particular site from sections Block e Allowby simply clicking on the icon with the dustbin that you find in his correspondence.
If proceeding as I have just indicated you are still unable to enable the use of the microphone on Chrome, make sure you have granted the necessary permissions to the browser in the operating system settings. So, click the Start button on taskbar, click on the icon Settings in the menu that appears and, in the window that is shown on the screen, click on the item Privacy.
At this point, select the voice Microphone from the left side menu and make sure that on the right there is the wordingmicrophone access for this device is enabled. If not, click on the button Modification located a little lower and move up On the lever that appears.
After completing the above steps, check that the switch under the heading Allow desktop apps to access the microphone that you find on the right is moved to On (others provide you) and carry on On (if necessary) also the lever at Chrome in the program list below.
If you feel you need further clarification, you can consult my guide on how to activate the microphone on Google Chrome.
How to activate the microphone on Windows 10